

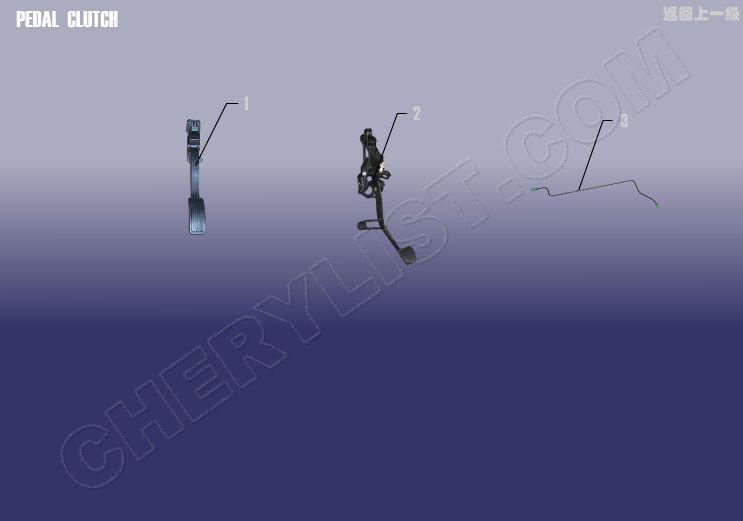
RHD PARTS PEDAL CLUTCH for CHERY TIGGO T11
1 T11-1108010RA ELECTRONIC ACCELERATER PADEL
2 T11-1602010RA CLUTCH PADEL
3 T11-1602030RA METAL HOLE ASSY
The clutch pedal is the control device of the manual clutch assembly of the car, and it is the “man-machine” interaction part between the car and the driver. In learning to drive or in normal driving, it is one of the “five controls” of car driving, and the use frequency is very high. For convenience, it is directly called “clutch”. Whether its operation is correct or not directly affects the starting, shifting and reversing of the car. The so-called clutch, as the name suggests, means to use “separation” and “combination” to transmit an appropriate amount of power. The clutch is composed of friction plate, spring plate, pressure plate and power take-off shaft. It is arranged between the engine and the gearbox to transmit the torque stored on the engine flywheel to the transmission and ensure that the vehicle transmits an appropriate amount of driving force and torque to the driving wheel under different driving conditions. It belongs to the category of powertrain. During the semi linkage, the speed difference between the power input end and the power output end of the clutch is allowed, that is, an appropriate amount of power is transmitted through its speed difference. If the clutch and throttle do not match well when the car starts, the engine will shut down or the car will tremble when starting. The engine power is transmitted to the wheels through the clutch, and the distance from the reaction to the clutch pedal is only about 1cm. Therefore, after stepping down the clutch pedal and putting it into gear, lift the clutch pedal until the clutch friction plates begin to contact each other. At this position, the feet should stop, and at the same time, the refueling door. When the clutch plates are in full contact, fully lift the clutch pedal. This is the so-called “two fast, two slow and one pause”, that is, the speed of lifting the pedal is slightly faster at both ends, slow at both ends, and pause in the middle.
How to disassemble the Chery clutch pedal
1) Remove the drive axle from the vehicle.
2) Gradually loosen the pressure plate bolts of the flywheel assembly. Loosen the bolts one turn at a time around the pressure plate.
3) Remove the clutch plate and clutch pressure plate from the vehicle.
Installation steps:
1) Check the parts for damage and wear, and replace the vulnerable parts if necessary.
2) Installation is the reverse process of disassembly.
3) For the 1.8L engine without turbocharger, use the clutch disc guide tool 499747000 or corresponding tool to correct the clutch. For 1.8L engine with turbocharger, use tool 499747100 or corresponding tool to correct the clutch.
4) When installing the clutch pressure plate assembly, for the sake of balance, ensure that the mark on the flywheel is separated from the mark on the clutch pressure plate assembly by at least 120 °. Also make sure that the clutch plate is installed correctly, and pay attention to the marks of “front” and “rear”.
2. Free clearance adjustment
1) Remove the clutch release fork return spring.
2) Sunca Russo lock nut, then adjust the spherical nut to have the following gap between the spherical nut and the split fork seat.
① For 1.8L engine, 2-wheel drive without turbocharger is 0.08-0.12in (2.03-3.04mm).
② Two wheel drive and four-wheel drive are equipped with turbocharger, and the 1.8L engine is 0.12-0.16in (3.04-4.06mm).
③ 0.08-0.16in (2.03-4.06mm) for 1.2L engine.
3) Tighten the lock nut and reconnect the return spring. [TOP]
2) Disassembly and assembly of clutch cable
1. Disassembly and assembly of clutch cable
Disassembly steps:
One end of the clutch cable is connected to the clutch pedal and the other end is connected to the clutch release lever. The cable sleeve is fixed by the bolt and fixing clip on the support, which is fixed on the flywheel housing.
1) If necessary, lift and safely support the vehicle.
2) Disassemble both ends of the cable and the sleeve, and then remove the assembly from under the vehicle.
3) Lubricate the clutch cable with engine oil. If the cable is defective, replace it.
Installation steps: installation is the reverse process of disassembly.
2. Adjustment of clutch cable
The clutch cable can be adjusted at the cable bracket. Here, the cable is fixed to the side of the drive axle housing.
1) Remove the spring ring and fixing clip.
2) Slide the end of the cable in the specified direction, then replace the spring coil and fixing clip and install them into the nearest groove at the end of the cable.
Note: the cable shall not be stretched linearly, and the cable shall not be bent at right angles. Any correction shall be carried out step by step.
3) Check whether the clutch is normal